Sunday, December 19, 2010

No Pressure Holiday Tables

I love all the preparations leading up to Christmas, but when the big day arrives I’m ready for things to be easy, easy, easy. The 25th should be about spending time with my family and playing with the kids not stuck in the kitchen or fretting over the perfect holiday tablescape. To help take some of the pressure off, I plan as much ahead as possible including quick table decorations from the grocery store or my own storage boxes.

Gather a few decorations you haven’t used elsewhere, selecting an array in one or two colors. For a holiday dinner party I put three candy striped candles and silver balls on a glass cake stand filling in the gaps with fake snow. Candy canes were tucked into white napkins for an extra sweet touch.


This family dinner table was set with pomegranates, satsumas and little lady apples placed on white platters down the center of the table. The colors from the fruit perfectly matched the vintage Christmas table cloth and red candles.

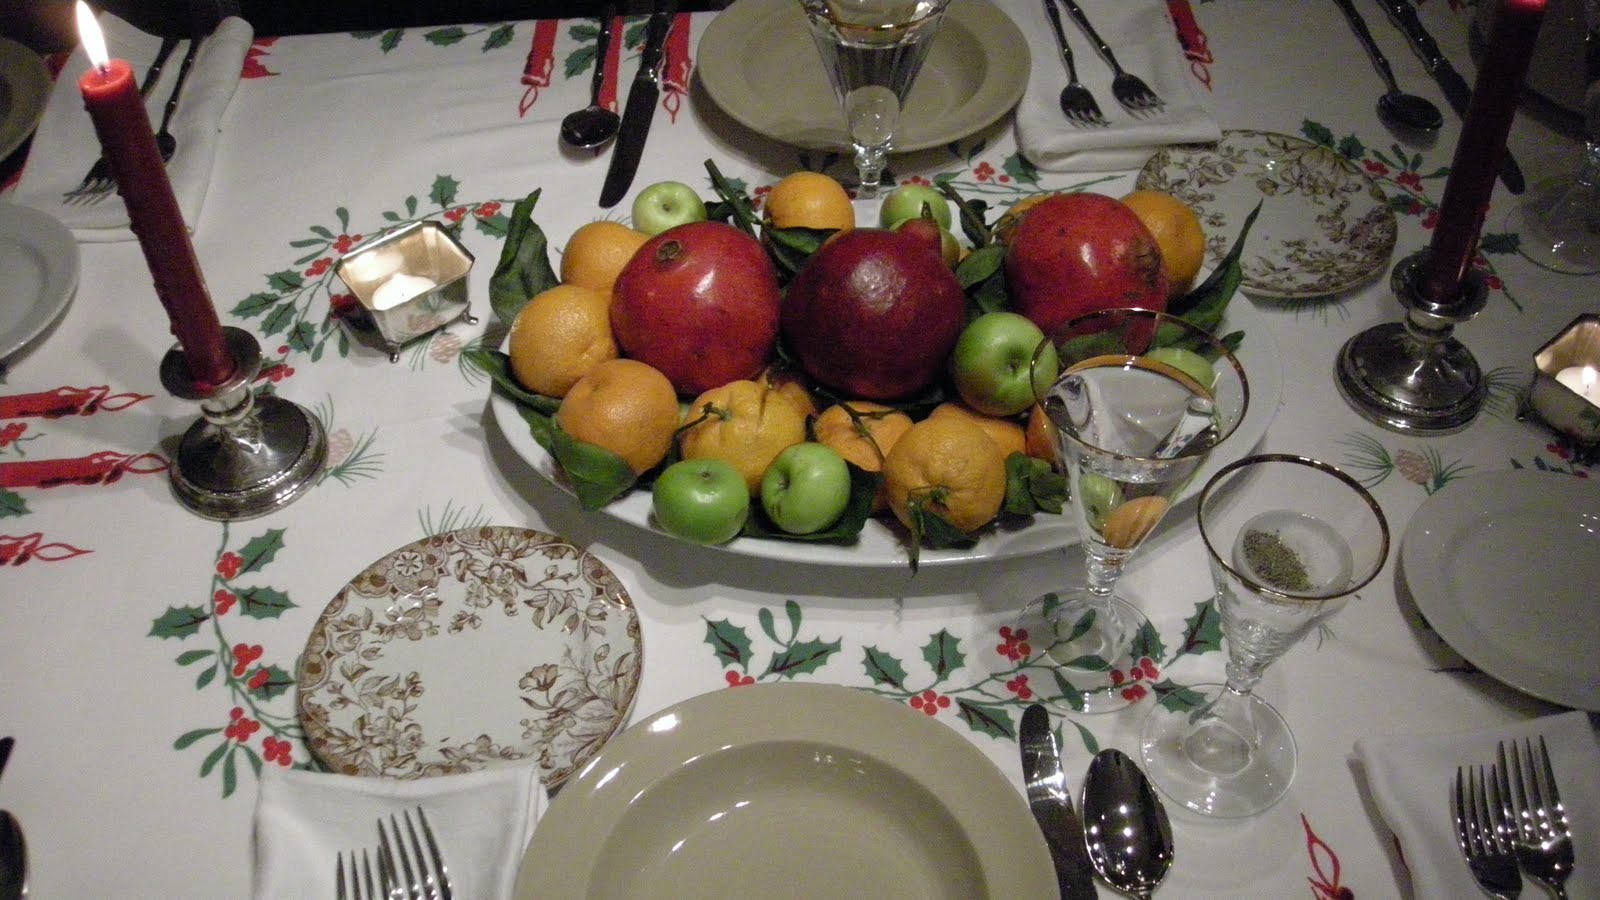
The table for this Christmas dinner is still undecided though my snow woodland theme will include pinecones and candle sticks made out of tree branches. And my white Christmas will definitely require more fake snow.

Tuesday, December 14, 2010

Deck the Halls 2010

I have flocked, glittered, hot glued, dremmeled, hammered, sawed, baked, hung, re-hung, arranged, and rearranged for nearly two weeks but I’m finally ready to show off the Christmas decorations.

I’m particularly pleased with the vintage pom-pom tree decked out in silver and blue. The winter village underneath is home to 60’s pinecone elves, bottle brush trees and glittered houses we’ve collected over the years. Nick and Linus helped me glitter an inexpensive plastic farm set adding more sparkle to the Daddy tree.

For the main floor I created a snowy feeling with the garland for the banister and flocking wreaths myself that I hung in the dining room with blue and silver faux bois ribbon.


This time of year I love to fill my favorite white pottery pieces with either yummy things to eat or pretty things to look at, like my collection of pinecones.


We always do a kid tree for the playroom and this year’s was cut down by yours truly. The beautiful and fresh Noble Fir is hung with red and gold ornaments, Peanuts characters and gingerbread Ls and Ns.


Merry Christmas!


Thursday, December 2, 2010

12 Days of Christmas Decorations


I'm always surprised how quickly home Christmas decorations go up, including the tree, so soon after Thanksgiving. Not in my house as a kid. Mom always trimmed the house two weeks before Christmas and then took everything down the day after – and if the tree was dry, down that came after gifts were open. A practical sentimentalist my mom who liked a clean house as much as her Tom and Jerry punch.

When it comes to my own holiday decorating I take after my mother. The planning and watching for new ideas begins in October but nothing is ever put up until December. I favor settling on a theme or color pallet when decking the halls to keep the house from feeling like an elf exploded everywhere. Sticking to a theme means on any given year some decorations get displayed while others are repacked for next time, giving us something different to enjoy each year. While we don’t dismantle everything on Boxing Day we do begin the New Year with a clean house and not a trace of glitter.

Since we’ve become parents I have made a point of doing a kid’s tree in the playroom, the one Santa leaves his haul under. The past two years I’ve decorated the boys’ tree with homemade gingerbread cookies: the alphabet decked out in red and white candy followed by green and blue trains. They boys were charmed by them, they made the room smell good and were safe for a 2 year old to occasionally snack on.

One of my favorite themes was a woodland Christmas, when I glittered and spray painted plastic deer. Another year I made wreaths from gum drops. Color pallets have ranged from silver and gold, gold and brown and blue and brown. In my book, the color choices or decorations can be centered around just the tree, one room or the entire house.

Visions of red, white and silver are currently dancing in my head. Visit next week to see how my halls are decked this year.

Friday, October 15, 2010

Dining Room: Before & After

I believe changing a light fixture is one of the easiest things that can most transform a room. Good and beautiful lighting is necessary to all the activities in your home, especially in the dining room. If you are considering a change in the light about your dining table taking the extra step and center the fixture over your dining room table. More often than not an electrician you never knew (and long before you even moved into your home) hung the current fixture in the center most spot of the ceiling. This makes sense to an electrician but certainly not an interior designer. Now you are stuck with a table and a light that don’t get along. A handy person can do a quick internet search and find a how-to on moving the junction box yourself or, as a fan of out-sourcing, you can hire an electrician for the job. It will seem like an inconvenience and cost some extra money, but this simple change will make you’ll fall in love with your dining room again and every time you sit down for a family meal or just walk by you’ll appreciate the harmony you created. That is priceless.


That’s exactly what we did in this Bryant dining room. The smoked and etched glass fixture had to go. We swapped it out with the more elegant Round Pendant Shade from Restoration Hardware. It was centered over a consignment shop dining table and pulled together with oval back dining chairs from West Elm. Now the modern lines of the seating compliment the classic shape of the fixture and the expandable table fits the period of the mid-century home.

Ballard House 2.0: Light fixture fix

Completely replacing the 3 pendant lights in our kitchen wasn’t in our immediate budget, but I couldn’t live with the frosted glass shades put up by the previous owner. The fixtures are only a few years old, and their bronze finish matches the rest of the lights and door knobs throughout the house. It finally occurred to me to simply replace the glass.

(Before: The frosted shades felt frumpy)

What I thought would be a quick and easy decorating fix did take several trips to hardware and lighting stores to find shades that fit and that I liked. The winner was from Harold’s Lighting in Wallingford. At $10 each, this affordable shade instantly made the kitchen feel more modern and sleek.

Inexpensive, transformative and no special tools required – your decorator’s secret for the day.

Sunday, September 26, 2010

Preserving a bit of autumn


The boys and I drove up to Leavenworth, 2 hours east of Seattle, to meet out of state family. Along the drive through the Cascade Mountains, yellow, gold and red started to peek through the green leaves and I was wishing I had brought a saw and cut a few branches for a leaf preserving project I’ve wanted to try out. As luck would have it, there in park in the middle of Leavenworth was a pile of tree branches bursting with autumn colors. Always a good sport, my Aunt Lora Lee helped me load some rather large branches in the back of the car. Then the real quest started. My leaf preserving project required glycerin which helps keep the leaves pliable and keeps their colors from fading, sometimes for years. Finding this agent (a by-product of soap making) was not easy, and after 3 days of phone calls, visits to every craft and natural store I could think of, I finally found it at Zenith Supplies in Seattle. By now, even though I kept them in water, my branches started to dry out a little. Still I crated these two arrangements in the house, mixing glycerin with water and a little dish soap to help break up the surface tension and to allow the glycerin to be more easily absorbed. I’m very pleased with how the leaves look and if it they don’t preserve this time, there’s still a few weeks to head to the hills and try to find a fresh batch of leaves. I’ll let you know how things turn out. Happy autumn!

Friday, September 24, 2010

Add style and wit with the x-bench


I’m obsessed with the x-bench. Impossibly chic, it is the perfect accessory to any room and adds unexpected style and a pop of color. It goes anywhere: the foot of the bed, under a console table, opposite the sofa for extra seating when needed. The yellow bench above provides a bright counterpoint to the room’s palate and pulls the interior together with a sizzle.

If you really want to add sharp style to your room, get two! Ballard Design may be your best bet with a price range from $179 - $371. You can get the bench in a wide range of upholstery options and can preview the look from a big selection of swatches. Don’t hold back, go for a print!


For a touch of luxury, Jonathan Adler has the x-bench in a wide range of colors and prints starting at $495 --- but you are worth it.

Serena & Lily’s Parker x-bench comes with piping options, adding a very sophisticated detail and a $599 price tag to match.

Thursday, September 16, 2010

Ballard Bungalow: Before + After

The Ballard Bungalow project is complete and turned out picture perfect. We tried a few new (even risky?) things and the results paid off.

Before: This rectangle room was cramped with no flow to the furnishings, lack luster paint and a drab floor.

The clients have two dogs, so we needed to pick colors and materials that would be paw and fur friendly. They also wanted a semi-formal room to curl up with a book as well as entertain. We chose Benjamin Moore Light Khaki in an egg shell finish for the walls. One of the true stars of the room is the vintage ceiling light fixture that’s original to the house. In order to highlight the light and give some sizzle to the room, the ceiling was painted with Benjamin Moore’s Newburyport Blue in a flat finish (why flat?).

It was important to the clients that we avoid purchasing from big box retailers and repurpose as much furniture and finishes as possible. The vintage camel back sofa came from The House in Magnolia and other furnishings were found online. With the dogs in mind, Flor tiles in a celery color were laid in the living room. Should anything happen, be it dog or drink, the tiles can easily be replaced and afforded a perfect fit for this unusually sized room.


Thursday, September 9, 2010

Bastille Rooftop Garden Tour


Michael and I got to tour -- and taste -- the bounty of the roof top garden at Bastille, one of our favorite places to eat in Seattle. With a French inspired bistro menu that includes up to 30% of their own roof grown crop, this Ballard old restaurant reminds us of Pastis, one of our most favored NYC spots. With a similar décor and vibe, you know you aren’t in NYC when you come up to the roof to find buzzing bee hives and wading pools full of peppery arugula


Bastille offers garden tours every other Wednesday during the summer. For our spin through the garden, Chef Fletcher took a break from the kitchen to show us around while we sipped cocktails made with honey from the rooftop bees.


Installed by Colin McCrate of Seattle Urban Farm Company, several custom built irrigated and heated boxes make up the majority of the garden, providing the restaurant with organic and seasonal produce all year. We saw that last sprigs of lettuce, soon to be replaced by chard and kale. Beets are thriving in a kiddie pool, wrapped for insulation. I’m sure Nick and Linus won’t mind if I coopt their pool for vegetables.

Just as Executive Chef Shannon Galusha assures us that no one has ever been stung by their bees, I get stung. But it was a small price to pay to peek inside the hive and sip their handiwork.

Chef Fletcher sent out a treat. It always pays to chat up the people who make delicious food.

It’s all about back to the land….or in this case, back to the roof. Growing one’s own food can be done in the most unlikely of places, and as Bastille demonstrates with great success, a little dirt, water and sun can connect you directly to the food you eat in ways a grocery store simply cannot. I’m eyeing our backyard now, wondering how many boxes we could get in there and what I should plant first.

Thursday, August 26, 2010

Modern decorating style you can steal!


I can’t help but be inspired by these pictures from the September issue of Martha Stewart Living. One of Martha’s chief lieutenants, Kevin Sharkey, had his apartment renovation chronicled in the magazine and I’ve been following his blog on the project for the past year. The overall color palette with the mix of vintage and modern furniture and accessories is stunning. Everything shimmers, too, from the use of mirrors, black marble table tops and velvet pillows. The final results are a look I would love to work with.


Sideboards from Bo Concept but personalized with black marble tops, an idea I plan to steal for the night stands in my bedroom.


Custom paintings in the style of Franz Kline. Love that idea! I'm thinking of hitting up a local art schools to ask one of the students to do the same thing for my home.


Tuesday, August 24, 2010

Flower gig: commitment ceremony


Arranging flowers for the dinner table is much different than coordinating arrangements for commitment ceremony, but I was up for the challenge when good friends asked for my help for their July celebration.


The couple wanted to balance the traditional with the masculine -- the sturdy but soft colored lily was their flower of choice and fit the bill.


The boutonnieres and corsages tied in with the blue and brown color scheme and complimented all the guests of honor. The couple was thrilled, the view was spectacular and the evening was perfect . Congratulations Christopher and Jim!